Kitchen Unit Designs: A Technical and Practical Educational Guide
The Comprehensive Guide to Kitchen Unit Designs
Kitchen units, often referred to as cabinetry or kitchen modules, represent the foundational infrastructure of the modern culinary environment. Beyond simple storage, these units are engineered systems designed to support the heavy loads of countertops, integrate complex appliances, and facilitate efficient ergonomic movement. The evolution of kitchen unit design has moved from freestanding furniture toward integrated, modular systems that prioritize “form follows function,” ensuring that every cubic inch of a kitchen’s footprint is utilized effectively.
Understanding the technical specifications and logistical requirements of these systems is essential for successful interior planning. This guide provides a neutral, detailed overview of the various construction methods, layout configurations, and material sciences that define the industry. Readers will gain insight into the differences between framed and frameless systems, the structural importance of carcass materials, and the practical considerations for budgeting and maintaining these high-use components over a multi-decade lifespan.
Overview of Kitchen Unit Designs
The core concept of kitchen unit designs is the modularization of the kitchen space into standardized or custom boxes known as “carcasses.” These carcasses are generally divided into three functional types: base units (which sit on the floor and support work surfaces), wall units (mounted at eye level), and tall units (providing floor-to-ceiling storage). The primary goal of these designs is to optimize the “Work Triangle”—the distance between the stove, sink, and refrigerator—thereby reducing physical strain and increasing task efficiency.
People commonly approach kitchen units through the lens of aesthetic “door styles,” such as Shaker or flat-panel. However, the technical expectation involves the mechanical integrity of the box construction. Outcomes of a well-executed design include a hygienic environment that resists moisture and heat, provides smooth mechanical movement through high-quality hinges and glides, and accounts for the “clearance” required for human movement. Modern designs frequently incorporate internal hardware such as pull-out carousels and soft-close dampers to enhance the user experience.
Key Categories and Construction Methods
Kitchen units are fundamentally defined by their skeletal structure and the degree to which they are tailored to a specific space.
Kitchen Unit Comparison Table
| Category / Type | Description | Common Use Case | Effort / Cost Level |
| Frameless (European) | No front frame; doors attach directly to the carcass walls. | Modern minimalist kitchens; maximizing internal space. | Moderate to High |
| Framed (American) | Features a 1.5-inch wood frame on the face of the box. | Traditional or transitional aesthetics; high rigidity. | Moderate |
| Stock Units | Pre-manufactured in standard size increments (3-inch steps). | Budget-conscious renovations; quick-turnaround projects. | Low |
| Semi-Custom | Standard carcasses with custom door styles and depths. | Mid-range residential remodels. | Moderate |
| Bespoke / Custom | Built to any dimension; no restriction on materials. | Irregular architectural spaces; high-end luxury. | Very High |
Choosing between these construction methods involves balancing storage volume against aesthetic preference. Frameless designs are generally preferred in small kitchens because the absence of a face frame allows for wider drawers and easier access to the interior. Framed units are often chosen for their traditional look and the added structural support the face frame provides when using heavier natural stone countertops.
Practical Scenarios or Thematic Applications
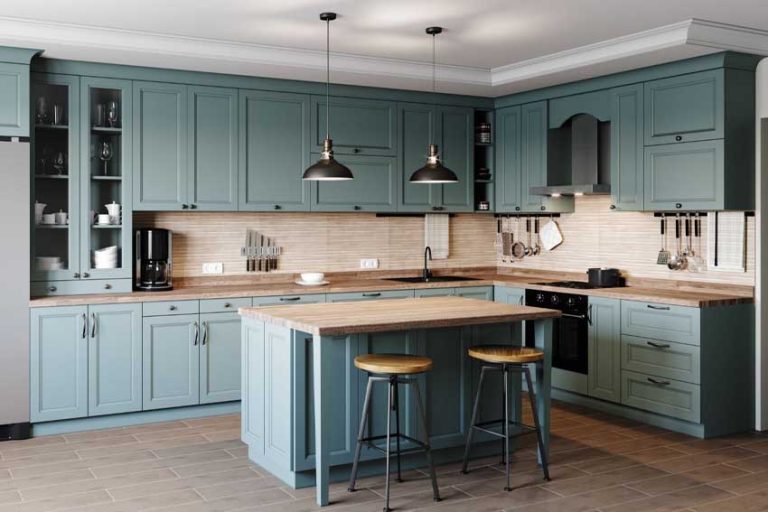
:max_bytes(150000):strip_icc()/SPR-kitchen-cabinet-ideas-5215177-hero-e6cfcf9e2a3c4dd4908e5b53d4003c40.jpg)
Scenario 1: The High-Efficiency Galley Kitchen
In long, narrow spaces, the design must prioritize the flow of movement between two parallel runs of units.
-
Components: Handle-less base units, deep pan drawers, and integrated appliance panels.
-
Steps: Establish a 48-inch walkway between units; utilize vertical tall units at one end to anchor the space; install pull-out larders for high-density storage.
-
Relevance: This scenario utilizes the “reach envelope” principle, ensuring that all essential tools are within one or two steps of the primary work zone.
Scenario 2: The Multi-Functional Kitchen Island
In open-plan homes, the island acts as a bridge between the cooking zone and the living area.
-
Components: Oversized base units with back-to-back storage, “waterfall” countertops, and integrated seating.
-
Steps: Reinforce the floor for the concentrated weight; install electrical outlets in the unit ends; ensure a 12-inch overhang for legroom.
-
Relevance: This application demonstrates how kitchen unit designs can serve as social anchors while providing secondary prep surfaces.
Scenario 3: The Universal Design / Accessible Kitchen
Designed for users with varying physical abilities or those wishing to “age in place.”
-
Components: Motorized height-adjustable wall units, pull-down shelving, and recessed toe-kicks for wheelchairs.
-
Steps: Lower the standard 36-inch counter height to 32 or 34 inches; replace low shelves with full-extension drawers; utilize D-shaped handles for easier gripping.
-
Relevance: This scenario prioritizes ergonomic safety and independence, showing that kitchen infrastructure can be adapted to human biology rather than forcing the human to adapt to the furniture.
Comparison: Scenario 1 focuses on speed and density; Scenario 2 focuses on social integration; Scenario 3 focuses on accessibility. Readers should select their configuration based on the primary occupant’s physical needs and the home’s architectural style.
Planning, Cost, and Resource Considerations
Preparation is the most critical phase of kitchen implementation. Because units are rigid, any errors in floor leveling or wall plumbing will be magnified during installation.
Sample Planning & Budget Table (Example Figures)
| Category | Estimated Effort / Amount | Explanation | Optimization Tips |
| Unit Materials | $4,000 – $20,000 | Cost of carcasses (MDF vs. Plywood) and door finishes. | Select Plywood for “wet” areas (sink base) for longevity. |
| Hardware | $500 – $2,500 | Soft-close hinges, drawer runners, and internal organizers. | Prioritize high-quality hinges; organizers can be added later. |
| Installation | $2,000 – $6,000 | Professional labor for leveling, scribing, and mounting. | Ensure walls are plumb before units arrive to save time. |
| Preparation | 2–4 Weeks | Measuring, templating, and ordering lead times. | Finalize appliance dimensions before ordering units. |
Note: Figures are examples and vary by region and material rarity.
Strategies, Tools, and Support Options
Successful execution relies on specific technical strategies to ensure that modular units appear as a single, cohesive architectural feature.
-
Laser Leveling: Using high-precision lasers to establish a “datum line” across all walls.
-
Advantages: Ensures countertops sit perfectly flat, preventing water pooling and stone cracking.
-
Disadvantages: Requires specialized equipment and clear line-of-sight.
-
-
Scribing: The process of cutting the side of a unit to match the exact “wave” of an uneven wall.
-
Advantages: Eliminates unsightly gaps and the need for excessive caulking.
-
Disadvantages: Highly labor-intensive; requires a skilled finish carpenter.
-
-
Support Brackets (Steel): Used to reinforce large overhangs or “floating” wall units.
-
Advantages: Provides safety for heavy loads without visible legs.
-
Disadvantages: Must be installed into studs before wall finishes are complete.
-
-
Suspension Rails: A metal rail system that allows wall units to be “hung” rather than individually screwed.
-
Advantages: Faster installation; allows for micro-adjustments in alignment.
-
Disadvantages: Relies on the integrity of the rail and the quality of the wall studs.
-
Safety, Risks, and Common Challenges
-
Moisture Infiltration: The most common cause of unit failure. MDF or particleboard carcasses can swell if exposed to leaks. Prevention: Use waterproof mats under sinks and ensure all plumbing penetrations are sealed.
-
Overloading Wall Units: Mounting units to drywall alone rather than structural studs. Risk: Structural collapse. Prevention: Use 3-inch cabinet screws and verify every unit is anchored into at least two studs.
-
Inaccurate Templating: Measuring before the floor is finished or walls are dry-walled. Prevention: Only perform final measurements after the room is “broom-clean” and structurally finished.
-
Formaldehyde Off-gassing: Some composite wood glues release gases. Safety: Look for “CARB Phase 2” or “NAF” (No Added Formaldehyde) compliant materials.
Maintenance, Best Practices, and Long-Term Management
The lifespan of a kitchen is determined by the transition from professional installation to disciplined resident care.
-
Weekly Care: Wipe unit faces with a damp microfiber cloth and pH-neutral soap. Avoid abrasive pads that can create micro-scratches in high-gloss finishes.
-
Hardware Tension: Periodically check the “sag” of doors. Most modern hinges feature 3-way adjustment screws that allow the user to realign doors that have shifted over time.
-
Track Cleaning: Vacuum drawer runners to remove grit and crumbs, which can cause mechanical wear on the ball bearings.
-
Atmospheric Control: Use exhaust fans while cooking. Excess steam can cause wood veneers to delaminate or paint to peel over time.
Documentation and Reporting
For custom or high-value projects, maintaining a technical record of the installation is a standard best practice.
Tips for Organizing Information:
-
Material Registry: Retain the exact paint color code or veneer species name for future touch-ups.
-
Hardware Specs: Keep a record of the hinge brand and model (e.g., “Blum soft-close 110-degree”) for easy replacement.
Illustrative Examples:
-
Warranty Management: A homeowner records the batch number of their thermofoil doors; if a door “delaminates” three years later, they can order an exact color-matched replacement from the manufacturer.
-
Facility Log: A commercial landlord records the installation date of units in 20 apartments to track depreciation and plan for a standardized “refresh” cycle every 15 years.
FAQ
Q: Is Plywood always better than Particleboard for carcasses?
A: Not necessarily. While plywood is more moisture-resistant and holds screws better, high-density particleboard is more dimensionally stable and provides a smoother surface for veneers and paints.
Q: What is the standard height for base kitchen units?
A: In the U.S., the standard is 34.5 inches, which reaches 36 inches once a 1.5-inch countertop is added.
Q: Can I change my kitchen unit designs by only replacing the doors?
A: Yes. This is known as “refacing.” Provided the carcasses are structurally sound and level, new doors and drawer fronts can be installed to update the aesthetic at a fraction of the cost.
Closing Summary
Successful kitchen unit designs represent a fusion of architectural durability and daily ergonomic convenience. By understanding the distinction between framed and frameless construction, adhering to strict leveling and anchoring protocols, and implementing a disciplined maintenance schedule, users can ensure a high-performing infrastructure. As the kitchen continues to evolve as the center of the home, the quality of these units remains the primary factor in determining the overall longevity and utility of the environment.